
Installing WordPress can be either an easy or difficult process, depending on which hosting company you’re working with. For people using Bluehost, Dreamhost, and Godaddy all you need to do is go into the control panel and do what is called a “one-click installation.” When running a “one-click installation” script you are basically telling the host where on the server you’d like the WordPress files to be placed, and creating a mysql database (with username and password) to house all the information that will be pulled in through the WordPress site. That is the quick and painless way to create a WordPress site, but not all hosting companies are created equal.
Recently, my colleague and I were in the market for a new company to host our client’s sites on. We were in search of a host that has great support, technology to accommodate database driven sites, respects the privacy of its clients, and has security measures in place which will prevent client sites from being hacked. After reviewing a slew of hosting companies we discovered Rackspace. Not only do sites (referred to as Cloud Sites) hosted on Rackspace run fast, but their chat support is informative and efficient. The only downfall to Rackspace is the arduous process required for doing a WordPress installation on a cloud site. Rackspace cloud sites do not have a “one-click installation” option, so to create a WordPress site you must start from scratch, and do it manually.
This post is split into four sections:
How to Create a Client
How to Add a Site
How to Create a Database
How to Install WordPress on the Server
How to Create a Client

Below is a step-by-step guide to installing WordPress on Rackspace Cloud Sites. It may seem like a pain in the ass the first time you do it, but, like everything else, it gets easier with practice.
_________________________________
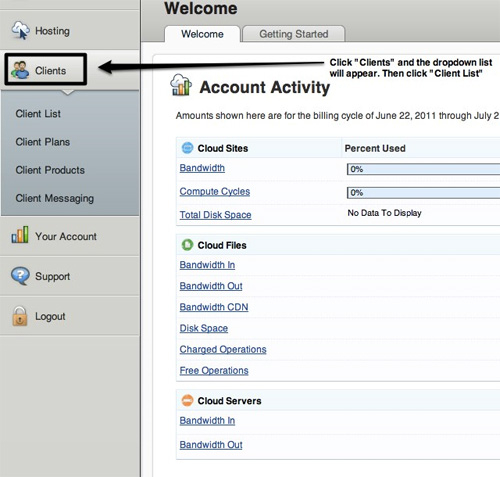
First thing you need to do is log into Rackspace (assuming you already have an account with them, and have enough room to start adding clients and sites to that account), and find “Clients,” located on the left hand sidebar. Upon clicking “Clients” a dropdown menu will appear, and you’ll click on “Client List.”
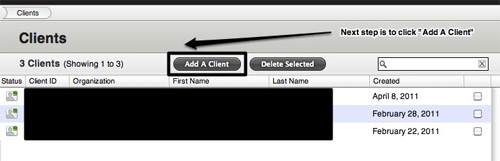
Click “Add A Client” to create a new client.
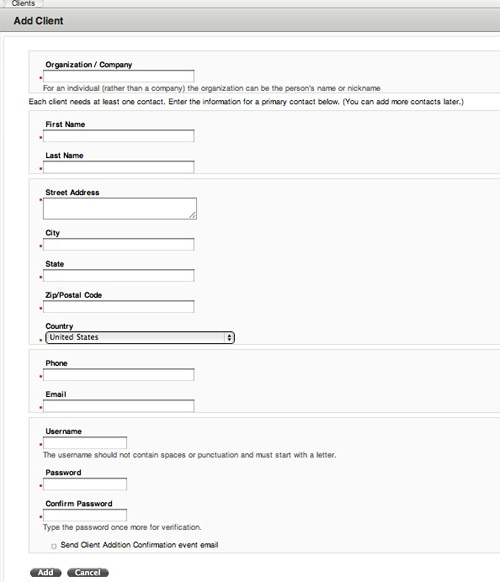
This is where you enter all the client information. (*make sure you write down the username and password in case you forget it)
This ends the area for developers. Usually, it is developers that create client accounts and plug in all the information. But, if the client is already in the system, then he or she can log in to Rackspace and choose their own hosting plan.
_________________________________
How to Add a Site
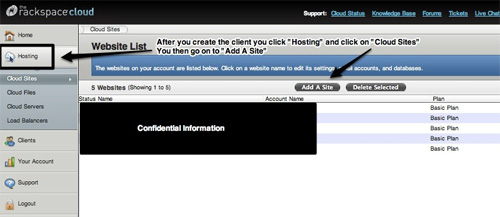
Adding a cloud site to a client is pretty straightforward. Similar to when you’re creating a client, you click hosting on the left hand sidebar, and then click on “Cloud Sites” after the menu drops down. After you click “Cloud Sites,” you will look for the “Add A Site” button and click on that.
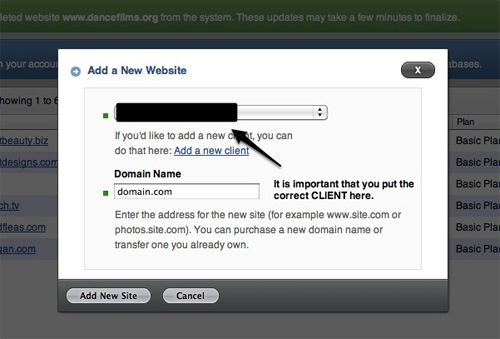
After clicking the “Add A Site” button, the “Add a New Website” field will pop up like a light box image. Here is it very important that you match the domain with the right client. You will click the drop down, and find the client, fill in the domain name, and click “Add New Site.”
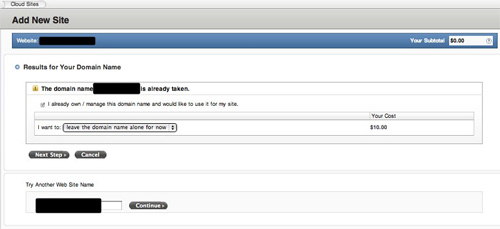
If it is a brand new website then you go ahead and choose “I want to ‘create a new site‘,” but some people may already have a site and just looking to redevelop or switch hosting companies. If that is the case, then you choose “I want to ‘leave the domain name alone for now‘.”
What this does is tell Rackspace that you already have a domain, but would like to create a development site. Rackspace will then create a domain address with series of random characters added on to differentiate between the live site and the new development space you’re creating.
This option is for developers offering hosting plans to their clients. If the hosting plan is included in the scope of work then you want to UNCHECK Bill Client for Site. This way, Rackspace won’t charge the client directly. Sometimes it is easier this way because the client might not want to be bothered with hosting issues. If this is not the case, and the client is responsible for all aspects of hosting, then you want to CHECK Bill Client for Site.

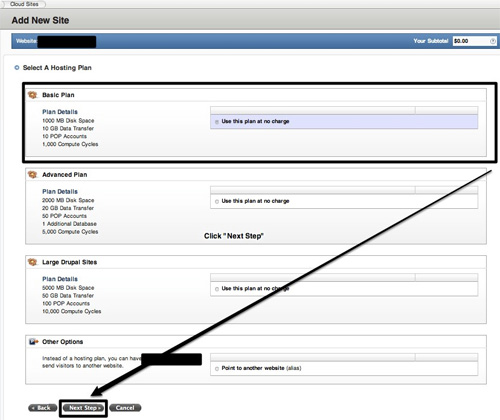
Here is where you decide what type of hosting plan you’d like to have for the new site you’re building. Depending on how much memory your site will require or how much traffic the site will incur indicates what type of plan your site will require. Most sites do not require more than the basic plan, which also does not add any extra costs. Some of the other plans are more expensive. After choosing the plan you want click on “Next Step.”
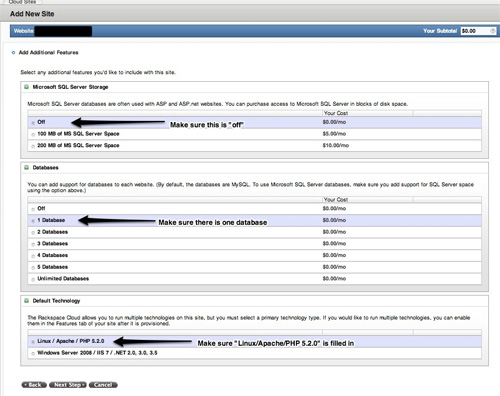
This next screen is very important. Keep in mind that this set of instructions is for setting up a client with a WordPress installation on a Rackspace cloud site. Your process may be different for other applications, or setups. Anything different or more sophisticated may require another set of instructions. Here, you must make sure the “Microsoft SQL Server Storage” is OFF, you choose on “1 Database,” and the default technology option is set to “Linux/Apache/PHP 5.2.0.” If you choose the wrong default technology it will create a problem later in the installation process.
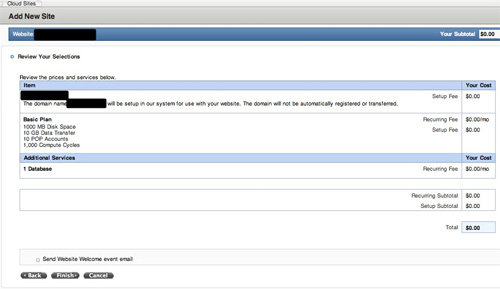
This is a summary of the site you’re building, and all the settings you chose. Please review this carefully. If everything is correct, click “Finish,” and voila, you have a new site on Rackspace. But before you can install WordPress on the site, you will need to create a database.
_________________________________
How to Create a Database
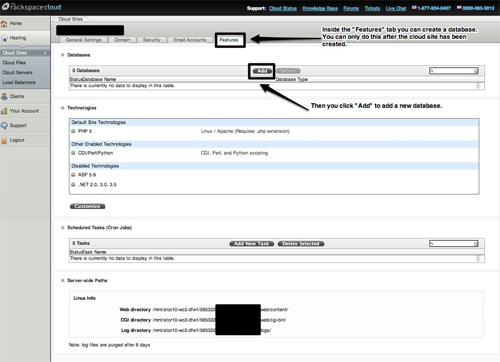
To create a new database go to the hosting panel on the left hand sidebar and click cloud sites. When you see the list of sites appear, click on the new one you created. Inside the site you will see five different tabs: General Settings, Domain, Security, Email Accounts, and Features. Go to the “Features” tab. Inside the “Features” tab, you will go to the database section and click “Add.”
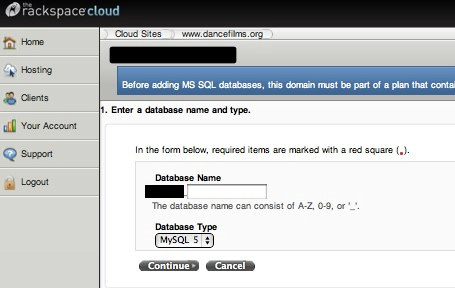
Here is where you create the database (db) name. It will start out with a series of numbers like “634576” Just fill in the box with a db name that has letters and characters (just to be safe). Then click “Continue”.
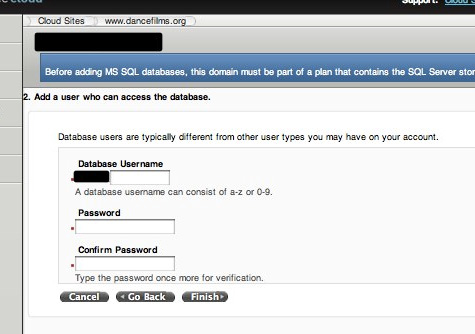
This area is where you will create the database username and password. Remember to keep this login information in a safe place because you don’t want anybody else messing with you database, and you might need to back up the database sometime in the future. The “634576” will repeat before the database username, so enter a username using letters and numbers. The password will have to be entered twice, and will require letters, numbers, and at least one upper case letter. Both passwords need to match for you to finish the database.
After a few minutes the new database will appear in the “Features” tab under “Databases” You will then need to click on the database to gather important information required for the WordPress install.
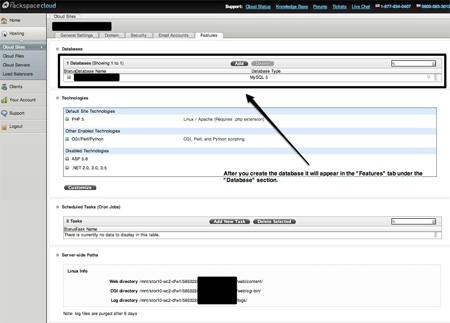
The important piece of information on this screen is the “Hostname”. Without the Hostname you will not be able to link the database to your new WordPress installation.

_________________________________
How to install WordPress on your server
Now that you’ve got your site and database setup, you’ll need to actually upload the WordPress files to your server. For this scenario, we’ll imagine that you’re installing WordPress inside of http://your-domain.com.
Most people who are doing manual installations of WordPress can download the most recent version of WordPress from http://wordpress.com/download.
However, there’s another quicker and simpler way to install WordPress on your Rackspace server.
1. Go to http://instantinstall.org
2. Download the installer. You’ll get a file called instantinstall.php. Once you have this file on your desktop, you can upload “instantinstall.php” to your server via FTP. Once the file is uploaded, you’ll simply visit the URL http://your-domain.com/instantinstall.php (just make sure to replace “your-domain.com” with your actual domain).

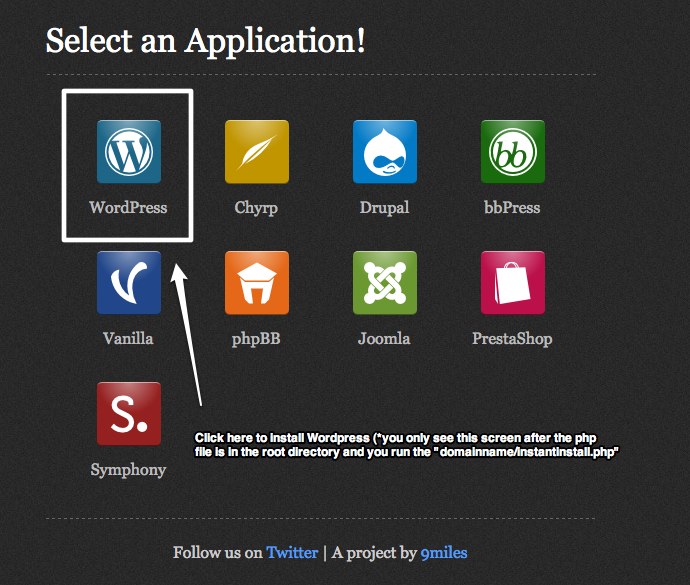
As soon as you run the installer you will see this screen. Because we are installing a WordPress site here you should click on WordPress, but just so you know, Instant Install works for all different Content Management Systems such as Drupal & Joomla.
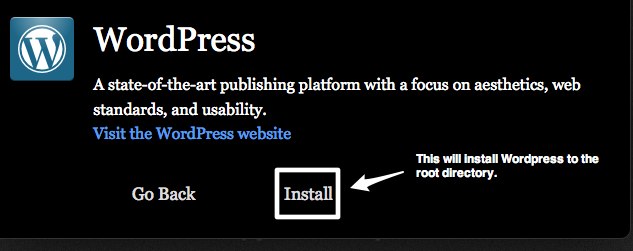
Here is where you click “Install”. This will drop all the WordPress files inside the directory you’ve chosen.
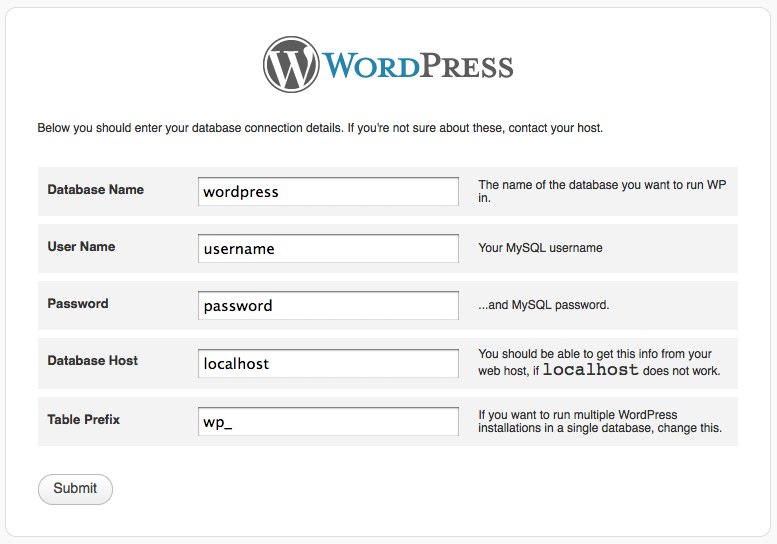
At this point, you will need the following information: Database name/Username/Database Password/Hostname. (All of this information can be found in Rackspace)
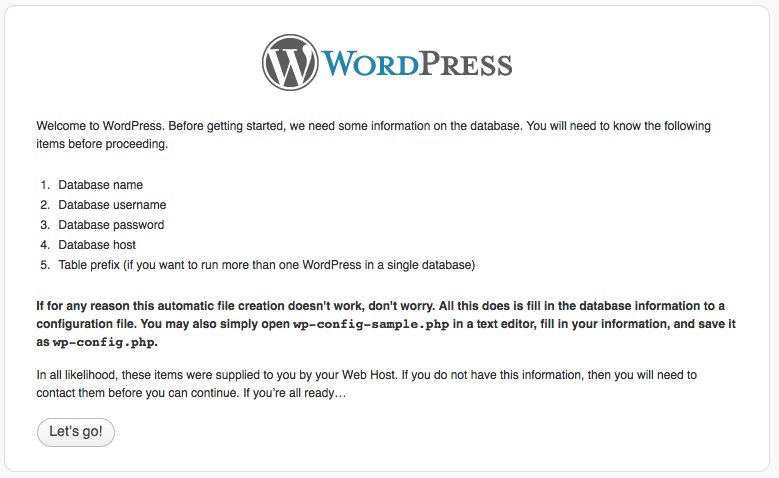
As soon as you enter all the information in the correct places, you can press “Submit”
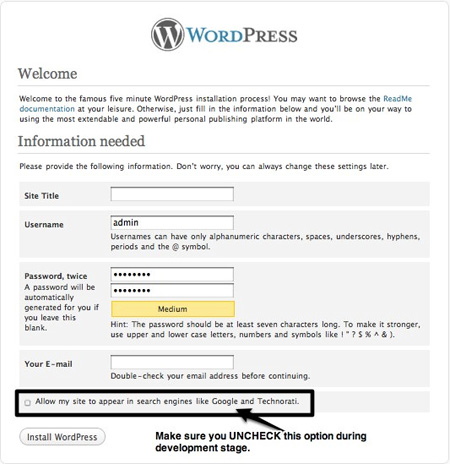
Then you will be taken to this screen where you enter all the information to access your new WordPress site. (Make sure you store the login information in a safe place, because you’ll need it to log into your WordPress site). If this is a development site, then you should UNCHECK the option to have the site picked up by search engines such as Google & Technorati. After clicking “Install WordPress” you will be prompted to go into the back end of the site.
After everything is installed you only have two more steps before your development site is ready to go. You must go back into FTP and find the WordPress installation. In the “root” folder you will see a file called “index.html” I call this the root directory because this is where your WordPress files are stored (technically, this would be your “public” root folder). Change the name of the file from “index.html” to “1_index.html”. If you do not do this, then the site will not appear. You will only be able to access the back-end. The front end will be all white.
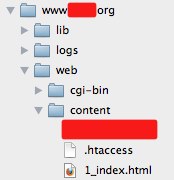
As you can see in the picture above, you will need to manually add a htaccess file so your site has enough memory to upload media.
Click Here to view a text version of htaccess
After dropping the htaccess file on your server your new Rackspace cloud site WordPress site installation will be fully functional, and ready for all the cool content you plan on publishing. If you made it this far down the post, then you are either crazy, passionate about technology, have nothing better to do, or really care about the efficiency of your WordPress site. This post documents the hardest part of the equation. The rest is smooth sailing after you follow these steps. If you should run into any roadblocks then you can always use Rackspace’s solid chat support. They have helped me out in more than a few pinches. WordPress is a very powerful Content Management System, but depending on where you host it makes a huge difference how well it works.